
WHEN it comes to chasing the elusive King George whiting quality sounder equipment is well and truly worth it’s weight in gold. The ability to confidently locate likely whiting bottom or interpret on-screen sonar returns can really make the difference between a successful day on the water and one to forget.
Thanks to highly detailed sonar imagery and target separation the Lowrance HDS Live certainly ticks all the boxes as far as this fickle species is concerned and for me it’s hard to imagine life without it when chasing a few inshore “KGs”. Now normally for a story of this nature I’d delve straight into the nitty gritty of sonar frequencies and settings however it is the often overlooked colour palette that I feel is equally if not more important and something to highlight straight up.
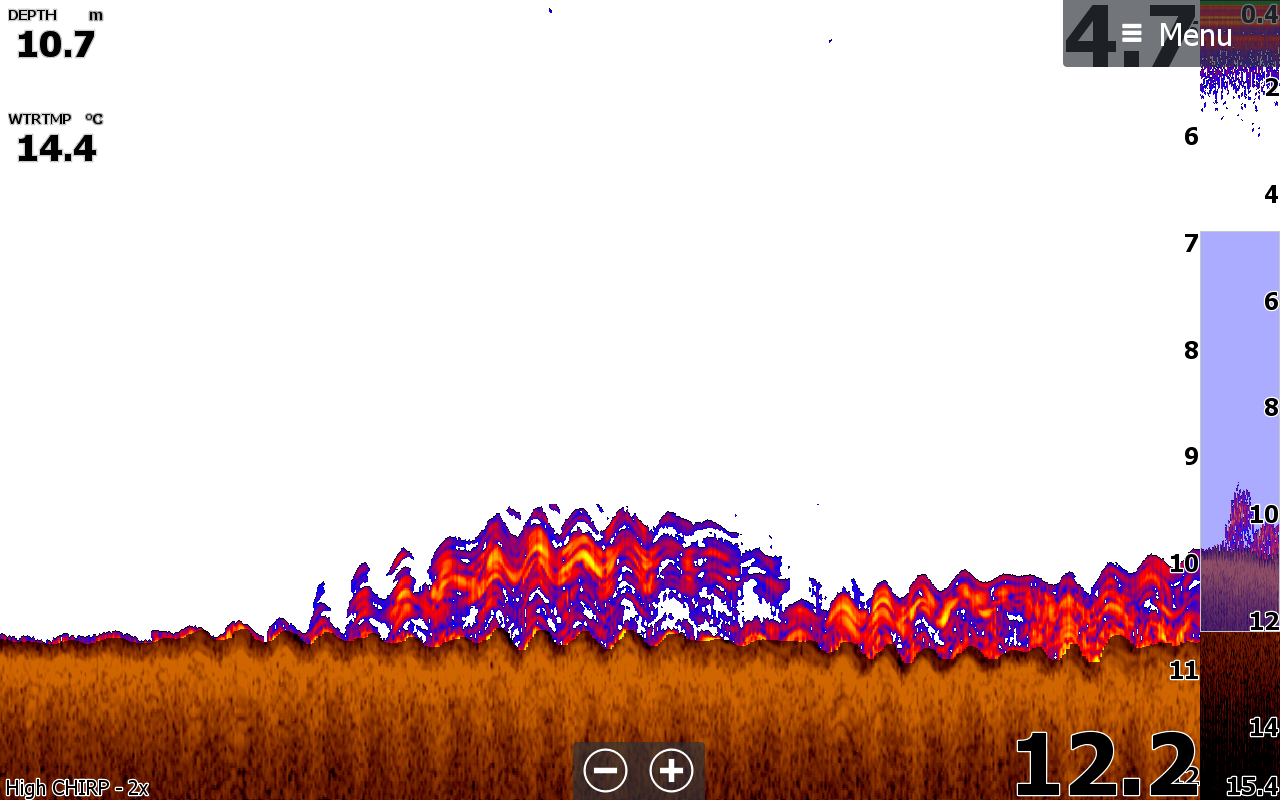
As with many of Lowrance’s higher end colour units we are provided with the ability to change colour palettes as desired, allowing anglers to hone in on a specific patterning in order to help unravel sonar readings or apply a certain palette to a specific scenario. Now depending on your situation and requirements you may very well find your own palette preference but for me when it comes to chasing KGs I really find it hard to look past the characterises of the number 13 Lowrance palette. Given that KGs love to roam extremely tight to the sea floor where they not only seek shelter from predators but search for food, this palette in my opinion affords the best colour contrast between pure bottom readings and likely fish returns. It’s not always smooth sailing with various underwater formations of reef, rock, sand and weed generally found in typical whiting zones to further complicate the interpretation process but this palette will certainly help distinguish between the two with improved confidence.
In this particular palette the bottom is demonstrated in shades of brown whilst typical whiting returns will be reflecting in blue and red. Hopefully you can appreciate this from any accompanying screen shots pulled off of my unit. Naturally you’ll find a bit of crossover when the fish can sometimes be mistaken for a patch of weed as they do blend in quite well at times but this is where the HDS Live’s impeccable target separation comes into play and you should still be able to decipher fish markings in one way or another. DownScan may also assist here to really pick it apart further although for some particular reason it’s not commonly utilised amongst mainstream KG fisho’s despite the merit behind it. In fact knocking up this piece has probably highlighted this even moreso and I daresay there’s a pretty good chance I’ll be exploring the realms of structure scan imaging on the next few whiting trips!
Now bear in mind that palette 13 is not the default setting chosen by your Live unit on initial startup so you will need to manually select it. For this particular HDS series this is performed through a very quick and smooth touch screen process by selecting the on-screen sonar window and following the prompts on the side pop-out menu. But once selected it will remain your chosen palette until another is manually selected or the unit is re-formatted and reverts back to factory settings.
Operating Frequency
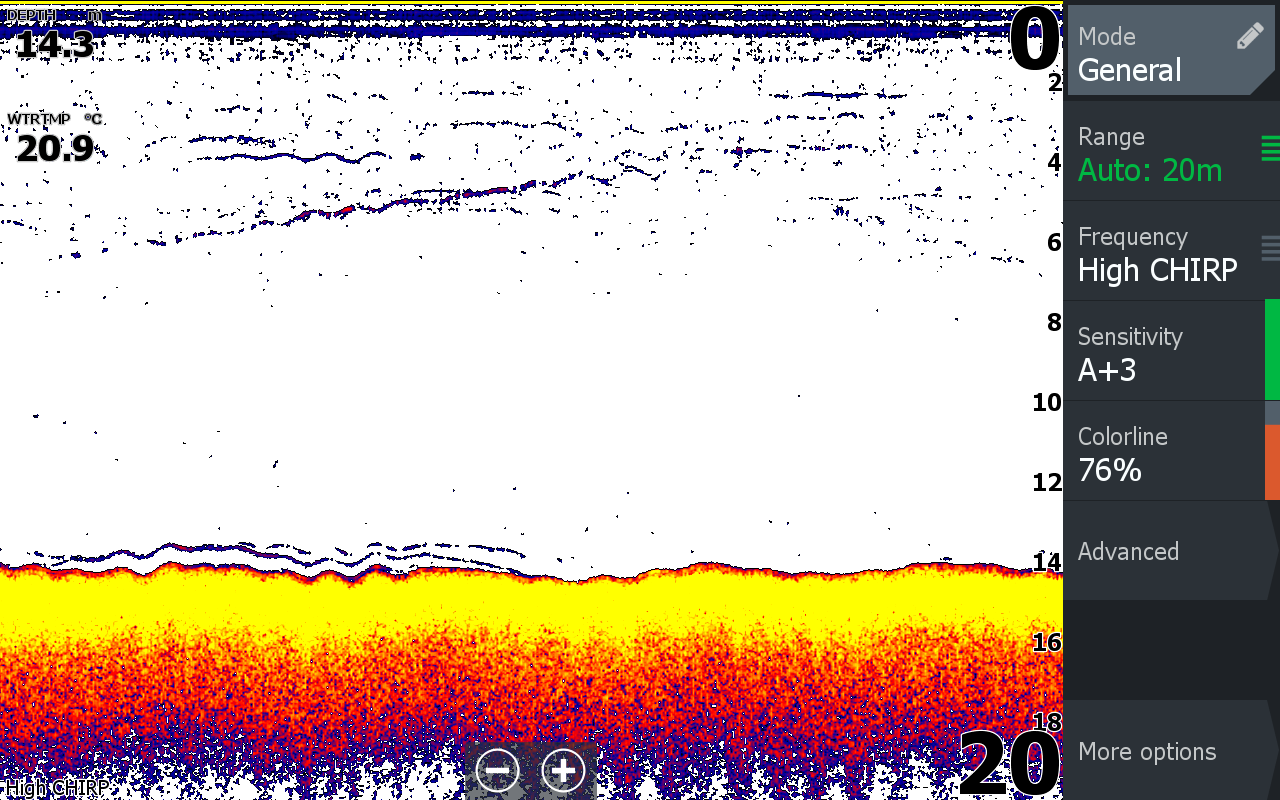
High CHIRP sonar frequency tends to be the norm on for those looking to access the most detailed information possible when chasing whiting, which let’s face it is in the best interest of any fisho. But even the more traditional 200Hz still has the potential to fulfil any keen whiting angler’s needs on the inshore zone given the detailed returns capable on these units. To be fair I daresay less experienced sonar users may not even distinguish any serious make or break differences between the two. Steer clear of the low range frequencies of 50-83Hz or Medium CHIRP as this will potentially limit your returns in shallow water inshore whiting zones. What we are looking for is high quality detail which is achieved through a narrow transducer beam or cone angle in the typical 200Hz range. This is contrast to a wider transducer beam delivered with lower frequencies that essentially provides more coverage over a wider area but at the cost of losing image detail.
We’ve found typical High CHIRP or 200Hz whiting returns to show up on the HDS Live in the form of blue squiggles with a red inner which is far from your textbook fish arcs commonly associated with sonar imagery. These arcs occur when fish swim in and out of the sonar beam at reasonable speed thus providing a very short sharp sonar return back to the transducer with a clear start and finish to the shape. When the fish is positioned centrally within the beam it is at its closest point to the transducer and that’s why the middle of the arc is uplifted compared to the start or finish when it is entering or exiting the beam. King George whiting on the other hand are fairly graceful in movement and they will often sit within the sonar beam for an extended period of time, especially when berley is involved. This sort of behaviour provides a constant sonar return back to the transducer rather than a quick-fire enter/exit and simply tells the unit that there is something remaining within the beam. As a result we see a more consistent squiggly line represented on screen and the longer the whiting stays within the beam the longer this line will be.
Screen Setup
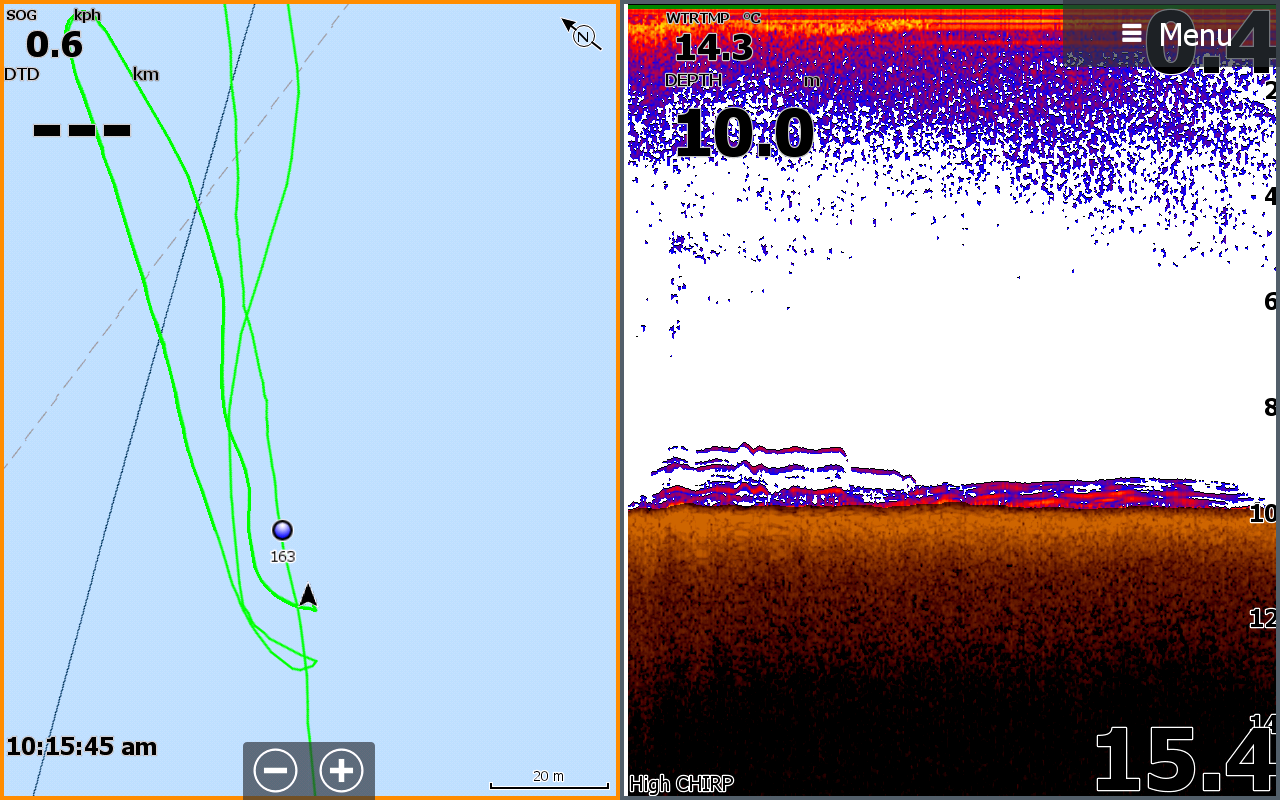
When it comes to KG returns using the number 13 palette we sometimes see the odd bit of yellow coloration inside of the red squiggle which in theory indicates a stronger return, a denser school or potentially larger fish. But there’s also many factors that will dictate how intense and thick these squiggles are such as what depth you’re fishing in and whether you’re visualising the whole water column from top to bottom or operating at a bottom lock / zoomed in level. It kinda makes sense to be running with the latter when chasing a bottom feeding species but I personally like to split the sonar window down the middle for a side by side comparison of full zoom vs no zoom because it provides even more detail for me to interpret. Some image returns stand out much more obviously or appear nice and crisp when zoomed out completely on your settings whilst zooming in too tightly can sometimes work in the opposite manner with a stretched out image that can potentially be much less sharp in nature. Splitting your screen is once again a very smooth and easy process on the HDS unit through the simple touch screen menu options and navigation. But either way the main take home message here is consistency and if you’re keen to further advance your whiting sonar skills then avoid changing settings too frequently in the learning stages otherwise you’ll hardly give yourself a chance to get used to a particular method or setup.
Gaining Confidence
Take note of real time comparisons and by this I mean if you’re catching whiting then correlate it against what you see on screen. This is the next best thing to dropping down an underwater camera to help visualise just what exactly your screen is representing. Sometimes things can get a little hectic during a hot bite so using the screen capture mode on the HDS unit is a fantastic way to save this information to look back on and interpret at another time. Building a log will further refine your sonar skills and I now know from our many years of chasing these fish that the moment we get small scattered blue dots showing up we will usually catch a lot of rubbish fish like small leatherjackets or other pesky bait stealers. This is a prime example where the target separation abilities of the HDS Live come into play and you can further narrow down the search of what you’re looking for. You’ll initially need to muck around with your sensitivity and colourline settings to achieve this in detail but once honed in on the Live you shouldn’t need to change it too much. For me this is a colourline somewhere around 76% and a slightly tweaked auto sensitivity adjustment. For the latter you can quite simply select an auto sensitivity option and manually bump it up or down a notch or two (which for example will be displayed as A+2 or A-2) to achieve the desired image clarity without too much clutter or noise on screen. You could go full manual mode and build the sensitivity up from scratch but these intelligent units are very good at putting you in the ballpark range already through the auto function process. You’ll certainly notice the difference in comparison to units of a lesser quality too that will basically display your fish returns as large blobs on the screen. This can be seriously difficult to interpret with no obvious fish markings or separation from one another let alone the bottom itself, further reiterating the general theme of investing in a quality Lowrance sounder that will more than pay for itself in the long run.
Navigation
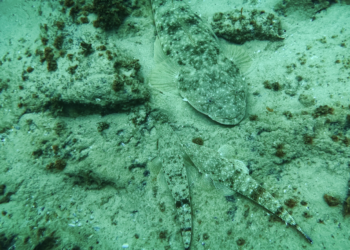
Finding whiting is not all about looking for guaranteed returns on the sounder so don’t necessarily get caught up in this alone. Locating the right kind of bottom makeup can be just as important for success. In deeper water or overcast murky conditions it can be very difficult for the naked eye to decipher what sort of bottom make up you’re sitting over exactly and you therefore rely on your sounder in these instances. KGs like a mixture of berry or cork weed and sand, commonly referred to as broken bottom, and it’s often the edges of the sand holes found in these locations that are most productive so keep an eye on these specific traits. DownScan and SideScan can be utilised in this scenario especially to depict the clumps of weed sticking up from the bottom. This HDS Live structure imaging is that clear you can literally count the individual strands of weed in perfect conditions.
Mark any points of interest in on your sounder and start to build a bit of a catalogue for future referencing. The same goes for when you hook into fish. Be sure to mark the waypoints and even go one step further by using a different waypoint icon or add some written notes to the waypoint information section through the touchscreen to avoid having a whole lot of marks punched in without any reference to go by. If you choose to target whiting on the drift then utilise your mapping technology alongside the sonar return with a split-screen setup. This is by far the best way to tackle your drifting as you can literally line up the waypoints, drift over them as desired and repeat as necessary to top up the bag. The sky truly is the limit with such awesome sonar technology available to us these days and thankfully the Lowrance operating systems make it super user friendly even for the more novice sonar user. The only problem with fine tuning your King George whiting sonar skills is that it may prove even more frustrating when you know they’re down there and simply won’t bite. But at the end of the day KG fishing wouldn’t be considered a challenge if it really was that easy!