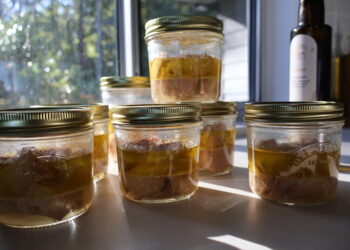
VACUUM sealing is a part of most fishos arsenal for their standard fish care. If it isn’t, it is time to get with the program. There is something satisfying about pulling out a perfectly portioned fillet from your freezer that you have caught and processed yourself. Large fish don’t necessarily need to be devoured within the first few days of being caught and can be spread out over months. The air tight seal prevents freezer burn and airborne bacterial growth. Spoilage and wastage can be reduced. The locked in freshness is easy to see when unwrapping your parcel. This article looks at diving into tips and tricks for enhancing your vacuum sealing including the best processes for defrosting and cooking methods for the sealed bags.
I have found that my wastage as a whole has been drastically reduced with the use of a vacuum sealer. When live baiting, often you lose a few slimies or yellowtail in the process. Instead of throwing them overboard, they come home and get vacuum-sealed for future dead baits. The same goes for the bloodline of larger fish. The white flesh on either side gets eaten at home, but usually, the intense flavoured and bony bloodline gets discarded. It happens to be one of the best parts of the fish to use as bait. Minimising waste and reducing the cost and time of bait collection in the future is not a bad hack.
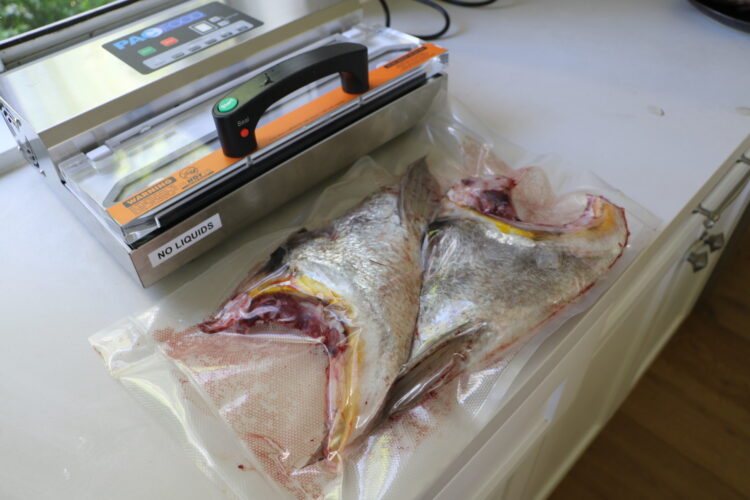
Using embossed bags that have a slightly thicker layering are fantastic for sealing whole fish and wings with reduced risk of puncturing the bag and creating an air leak. I like to use some kitchen shears to trim the fins and tail to remove spiky sections of the fish and reduce the overall size and volume of the fish. Taking the tail off means you don’t need to cut as much sealer bag from your roll.
Little offcuts that are usually discarded or any of the hard to reach parts of the fish can also be vacuum sealed. I get a bowl for all the offcuts including using a spoon to remove flesh from between fins. It gets sealed to use for fish cakes, burgers or nuggets down the track. On larger fish, there is usually more than enough for a meal by putting in this extra effort. Because the offcuts aren’t in fillet form in means that the cook has to think of a different way to cook them. This keeps mealtime interesting with the potential for unique flavours for your fish.

Labelling and distinguishing your parcels
After sealing I like to use a permanent marker to label the fish. The species and date it was caught is important. Any extra labelling such as seasoning, marinates or the particular cut can be useful for its application. Leaving the skin on the fish will also help you identify the species. If this is the case avoid scaling the fish. Scaling the fish can damage the skin and increase the risk of moisture seepage into the cells causing spoilage. It is easy enough to scale or skin the fish before cooking once defrosted.
Drying
Most vacuum sealers will not be able to seal liquids. It is important to dry your fish off as much as possible before sealing. This will make the fish feel like it has just come out of the ocean, even after months in the freezer. There are a few ways to remove the moisture before sealing. Leaving your fish in the fridge overnight on a drip tray so that it isn’t sitting in excess residue is a great way to start. If you have hanging space in an old fridge or dry ager this is the best way to have your fish in optimal condition pre vacuum sealing. Using a paper towel to pat dry the fillets right before they go into the bags is a last measure.
Marinating
Vacuum sealing your seafood with particular marinates can help improve the penetration on the flavour into the fillets. With the pressure from the vacuum the flavour has nowhere to go except into the fillets. Start off with dry rubs or herbs. These will stick to the fish and won’t pose any risk of damaging your machine with moisture. Ideas like taco seasoning are a great way to save time down the track and improve the traction of the rub.
If you want to take your marination game to the next level you can introduce sauces. Some vacuum sealers have an external marination feature. But if you don’t have access to the tools you can soak your fish in the sauce and then pull it out so that it has a solid coating without pooling in sauce that could be sucked back into the machine.

Sous Vide
Sous Vide is a cooking technique that involves a warm bath of water to slowly cook your fish. The fish is defrosted and stays in the vacuum sealed bag. Using bags that are BPA free is a great way to keep you and your family safe, even through the freezing process. The fish usually sits in a consistent temperature of around 60 degrees Celcius for around an hour. There are apps on your phone that can guide you on the time and temperature of the protein and size to get the best results. Once removed from the water the fish would be briefly seared in a pan to give the fish texture.
The benefit of Sous Vide cooking is that there is no shrinkage of your protein when it goes into the water in the sealed bag. When you cook a steak or fillet of fish it reduces in size because the moisture content is removed. Sous Vide retains the structure and composition of the fish so you get a juicy product with a low risk of drying out. Doing this with marinated fish will also produce exceptional results.
Some fish lend themselves to Sous Vide styles of cooking better than others. Larger firm fish are going to be able to hold their shape through the slow cooking process. Larger species such as kingfish, mackerel, tuna, mahi mahi etc are ideal whereas softer fish such as whiting, tailor or bream may not work as effectively or will need more consistently controlled environments.
There are specific Sous Vide cookware that can be used. Or you can whip out a thermometer to try to find the perfect setting on your stovetop.
I love taking pre-made meals camping. You can cook just about anything, vacuum seal it and then take it out bush. Simply heat it up in a warm bath of water and that meal will taste like it has just come out of the oven, off the BBQ or whatever medium it is cooked in. Seafood chowder would be a game changer. It saves time and space on your camping trips.

Defrosting
If you have ever experienced fish that didn’t live up to the level of cre that you gave it, defrosting may be a process that you overlooked. Having used the best processes such as Ike Jime, Shinke Jime, bleeding and ice slurries I have been undone by thoughtless defrosting. It is important to take your fish out of the freezer and defrost ahead of schedule. Throwing it in the sink places the fish in an unsafe temperature and could lead to spoilage. It is pivotal that the fish is defrosted in the fridge, overnight or in the morning before work is ideal for a fresh-tasting dinner. If you are at a loose end, Sous Vide is a technique that can be used with frozen fish, just add another 15 minutes to the cooking time.
I took two samples of kingfish and defrosted them separately to see the results. The fish defrosted in the fridge was far superior to the fish that was left in the sink. Both fillets were cut from the same fish and were treated with the utmost respect post-catch. The fish in the sink smelt a little fishy and had developed a slightly mushy texture. The fish that defrosted in the fridge was sashimi grade.
I was blown away by the fact that there are so many simple steps that need to be followed to reach the restaurant quality that we strive to achieve.

Experiment
I wasn’t finished with my experimenting. I took 3 small sections of shoulder from the same fish and froze them for 3 months. One in a zip lock sandwich bag, the other wrapped in cling wrap and the last was vacuum sealed. They were all defrosted in the fridge.
The vacuum sealed looked as if it had just been filleted once defrosted, as expected. The sandwich bag fillet had developed some slight freezer burn. And the cling wrap was somewhere between the two.
I cooked all three fillets in the same pan and found that the flavour and texture followed suit. The vacuum sealed fish was superior and confirmed the need for all anglers to have them ready to preserve the quality of their catch. The fish sandwich bag had the most air and the freezer burn was visible, the flavour was slightly fishy and the texture was tougher. An interesting test to show the value in the complete process of how to extract the best yield from a single animal, start to finish.
Happy sealing.